A note before the post: a continuous stream of video that shows the back of your vehicle can be a serious distraction from driving, and it’s important to ensure that any backup camera setup is only used in a safe manner. Keep in mind that what’s in front of your vehicle is probably more important than anything behind. You should also be sure to comply with any local & federal laws you may have concerning running screens in the front. Be sure that you comply with your local law as far as screens visible to the driver goes.
Using a backup camera to back up your vehicle is useful, but many people wonder if there’s a way to keep the camera on all the time, regardless of whether or not you’re going in reverse. The short answer is yes, this is completely possible, though it will likely require some DIY work, as you will likely need to connect the camera to your running lights circuit.
Now, you can avoid some of the crazier things we’ve seen on the internet by having the proper system.
Now, how do you go about doing that? Don’t worry, we’ve got you covered.
- Assembling tools
- Getting the right camera
- Understanding your vehicle
- Remove the interior panel of your trunk
- Remove your license plate
- Running and connecting wires
- Mount the Monitor
- Testing it out
Now there are some solid methods out there to hack your internal navigation system:
Which might work sometimes. As well as some methods that might win you a darwin award.
But we suggest that you get the right tools.
There are two things you need to make this happen. In most cases you need a system that’s independent of any OEM configuration. While there are ways to hack factory navigation systems we don’t recommend it, and we suggest that you instead rely on the right system.
First you’ll need a backup camera that’s powered independently of the reverse light. An extremely common wiring configuration is to use the reverse light. You can’t use your backup camera while in drive if it’s only powered while you’re in reverse.
Second, you’ll need a system to that is also powered independently of the reverse light. Again occasionally common in the DIY space even in the front cabin, and this monitor most likely needs to be aftermarket.
Now we’ll cover the key points here, but for a better overview of how to set up a backup camera, read our rear view camera installation guide.
Step 1. Assembling tools
To start, you’re going to need the right tools for the job. If you’re considering installing a continuously running backup camera feed in your car, more likely than not you have some tools laying around. But, here are a few things you’ll probably need:
- Hand drill with drill bits for drilling metal (preferable high speed bits coated with titanium oxide)
- Torx set
- Wrench Set, or an adjustable wrench of some kind
- Safety Goggles
- Flashlights
- Standard wire stripper/crimper
- Torx socket set
- Utility knife
- Socket or nut runner set
- Several grommets for camera installation
Step 2. Getting the right camera
Backup camera installation cost is often entirely dependent on you! The units themselves can range in price from:
- <$100 for a basic backup camera. There are always cheaper options out there, but they typically have weaker cables and less weather resistance than our products.
- $100-200 for a universal license plate style backup camera or wifi enabled smartphone backup camera. These are standard workhorse backup cameras that will get the job done.
- Depending on your desired bells and whistles we also have a great selection of high quality universal backup cameras
Step 3. Understanding your vehicle
In many cases, if your vehicle already has a backup camera installed inside of it, it’s unlikely that you camera will be able to be repurposed to give you a continuous video stream. We’re not going to rule that possibility out entirely, but OEM systems are often difficult to modify to exceed their existing functionality, so we’ll leave that component up to you to sort out on your own.
Wiring your vehicle to broadcast continuous video to a monitor doesn’t really change that much from installing a backup camera, but there will be a few differences and things to watch out for. It’s a good idea to familiarize yourself with a wiring diagram for your specific vehicle. Often backup cameras will come with one that helps you, but only if you’ve purchased one for your particular make and model. We have those available, so that can be a great step that will make your life easier.
Another thing to keep in mind before you start is that a continuously running video camera will have more power requirements than a traditional backup camera, and as you will be wiring it into your running lights, it might drain your vehicle’s battery more than expected. Talking with a mechanic before you get going can be a helpful step to ensure that your vehicle’s electrical system is up to the task.
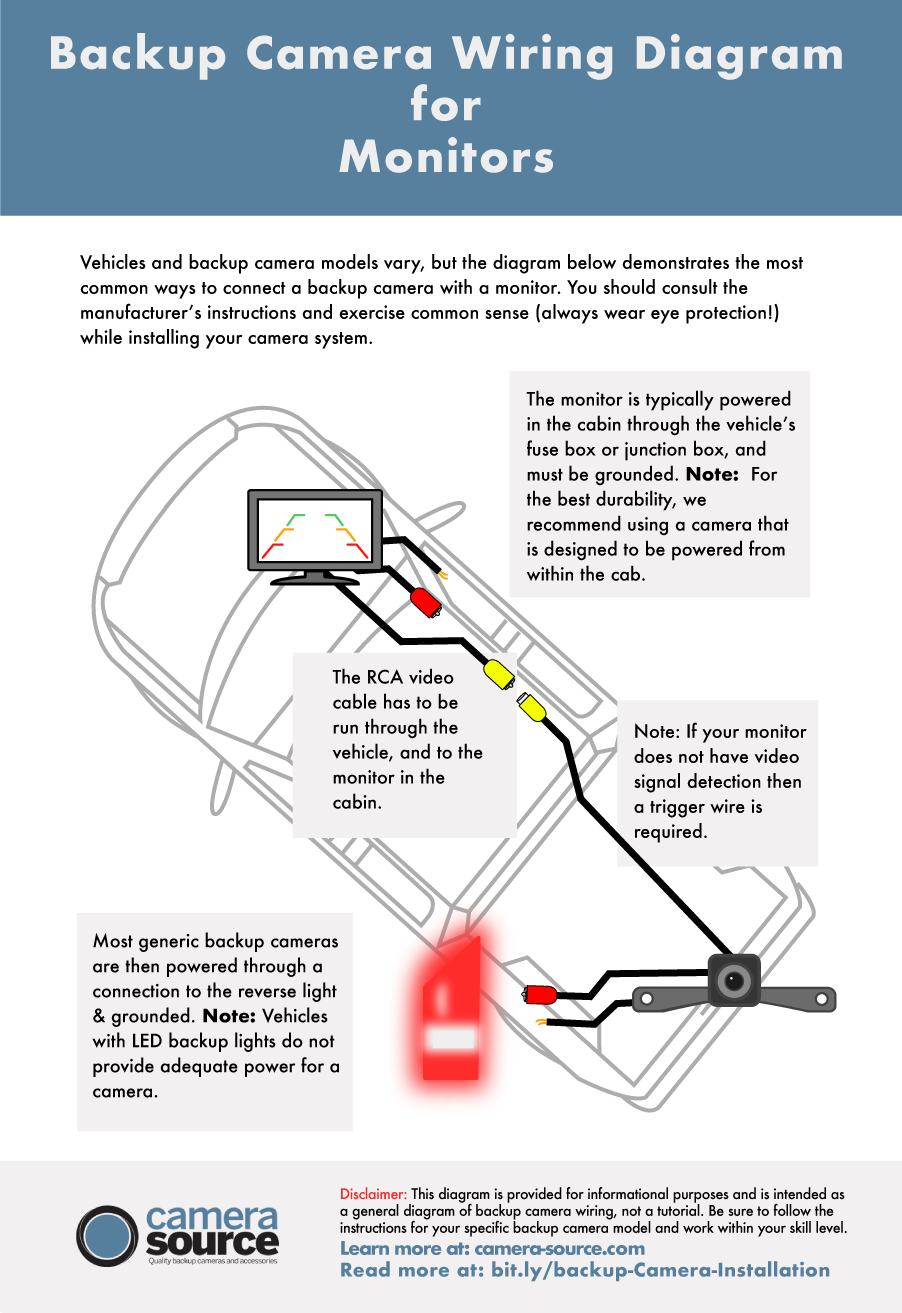
Below is most likely the configuration you’ll need to use:

DIY time!
For the purposes of this example, we’re going to assume you’ve acquired a rear view mirror kit or one which you can mount on top of your dashboard or to your windshield. There are advantages and disadvantages to both, so we won’t advocate for either here. However, we do recommend that if you’ve bought a kit, use the monitor that comes with it, as that will make things much easier.
Next, you have to ask: Are the provided cables long enough for my car? It’s better to have too much than too little, because you can always trim it down or secure extra wire. With too little wire, you might find yourself out of luck right in the middle of a project.
Make a rough measurement from where you’re going to place the camera back to your trunk/license plate area. That will roughly correspond to what you need, and make sure you have a few extra feet just in case. All of which is to say, make sure you chosen kit will actually fit in your car, truck, or SUV. While we include plenty of high quality wire in our kits, you can typically tell a low quality backup camera kit by how much thought went into the connector wires quality.
Before you get started you’ll want to read and reread the instructions. Installing a camera should be painless if you know what you’re doing, and have familiarized yourself with the process.
Your camera is most likely going to be installed just above or on your license plate. We’ll start there. Here’s what to do:
Step 4. Remove the interior panel of your trunk
This is likely hard plastic or rubber, and you should be able to use a think tool like a flathead screwdriver to pry it off. This won’t break anything, and it will give you a good look at all the cables necessary. Most things can be finessed out--if you’re snapping plastic you’re getting too aggressive during the installation process.
Step 5. Remove your license plate
Making sure you’re not going to cut any existing cables, drill a hole from the exterior side of your trunk that will be large enough to run the necessary cables through. You’ll add your license plate back later, but it’s a good idea to make sure that if you’re going to be installing the camera over the plate that you won’t be blocking your license plate number.
Insert one of the rubber grommets you bought earlier. Now you’re ready to start running and connecting wires.
Step 6. Running and connecting wires
Here’s where we start to figure out how to power our newly installed camera. Let’s go!
Run the camera and power cable through the hole into the interior of your car.
Locate the running lights wiring for your car. This is a tricky step, and you want to make sure that you do a good job. This is how to connect a backup camera to the continuous power that powers the running lights of your vehicle. Make sure to double check your owners manual to ensure you’ve located the right one. Like we said before, it’s also a good idea to double check that your car’s electrical system can handle the newfound power drain before installing as well.
Strip the positive and negative wires on the running lights cable (make sure your car is powered off before you do this). Using a small screwdriver, separate some of the strands of the stripped wire, and splice in the power cable for your backup camera to them. Usually you can do this by looping the wires together. Make sure positive is connected to positive and negative is connected to negative. Once you’ve done this, cover everything in electrical tape.
Connect the RCA cable to the camera’s cable, and run it all from the trunk to the fuse box area at the front of the car. This is usually located to the bottom left of the steering wheel. You can conceal the cable underneath the ceiling panels of your vehicle if you want to peel them back, or if you don’t care about aesthetics, just attach it to the ceiling of your car.
Step 7. Mount the Monitor
Next step is mounting your monitor. It may be one that mounts to your rearview mirror, or one that mounts to your dashboard. In either event, following the mounting instructions that come with the device is your best bet. If all else fails, this backup camera installation guide can be very helpful.
Connect the RCA cable to the RCA output on the monitor. You may also need to run a trigger wire up to your monitor, or even power it through the same source as the backup camera. (Again models will vary.)
If the monitor requires it, you’ll likely need to install a fuse tap, which will allow you to connect the bare wiring of your monitor to the power of your fuse box. See the guide linked above for good instructions on how to do this.
Step. 8 Testing it out
If all has gone well, you should be able to power on the monitor for your rear view camera and see a stream of video detailing the rear side of your vehicle. Congratulations, you’ve essentially created a backup camera that you can use while driving. How to use a backup camera while driving? Well, we suggest only using it if you’re entering an environment where that rear view will be necessary, and powering off the camera when it isn’t being used, to keep the overall wear and tear on the battery down over a longer period of time. Generally speaking these kinds of systems are best suited to private property and farms where the safety value of a continuous feed outweighs the danger of a potential distraction.
If you encounter any issues you might want to reference some of our basic support guides like:
If you’re experiencing problems, double check the manual and remember that most problems in environments like this come from bad wire splices, bad connections not tying off unused power cables.
Now, if you’re looking to get started on this journey, browse our stock of cameras to see what might work best for your vehicle, and get in touch with us if you have any questions.


